Essential Checklist for Facebook Live Guest Shows
Wondering what tools and desktop software you need to produce a Facebook Live show?
Looking for a guide to tech setup and pre-show production?
In this article, you’ll discover how to manage the technical side of a Facebook Live show.
#1 Live Video Gear
During any Facebook Live show, it’s vital that someone controls the tech. On simple shows, this may be as basic as clicking the Go Live and End Broadcast buttons. With a co-hosted (or interview) show or a more professional setup, however, someone needs to change scenes, add titles, set up screen sharing, and more.
This article examines the tools and equipment you’ll need to broadcast from your desktop computer. If you’re looking for other broadcast options, explore live video setups that fit any budget.
First, let’s look at the gear you’ll need to produce quality Facebook Live broadcasts from your desktop.
Computer
You’ll need a powerful computer for live video. The more impressive your computer’s specs, the better. Here’s a quick rundown:
- You’ll need a modern PC or Mac. It’s cheaper to buy a desktop PC with higher specs than a Mac.
- A fast, quad-core processor is ideal.
- 16GB of RAM or more is best (but 8GB is okay).
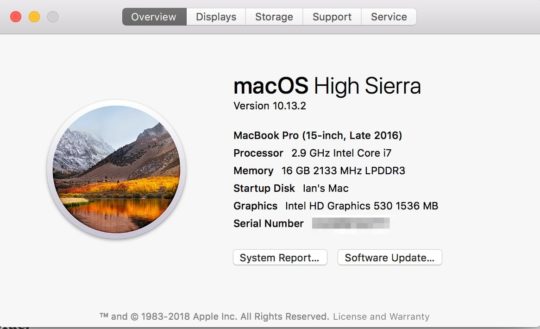
Ideally, your desktop computer should have at least 16GB of RAM to broadcast to Facebook Live.
- While optional, a dedicated graphics card can make a big difference in performance. OBS Studio, vMix, Wirecast and some other tools can use the dedicated graphics card instead of your computer’s integrated graphics for the video encoding.
- Two displays make it much easier to manage a co-hosted show. You can conduct the interview on one monitor and control your show from the other.
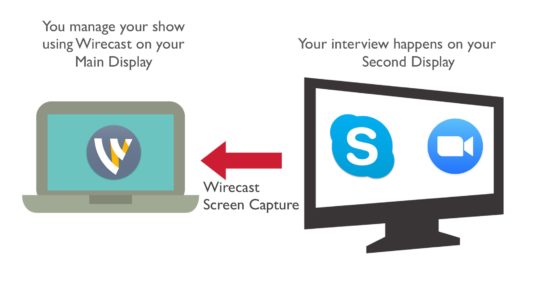
If your computer isn’t powerful enough, consider using a two-computer setup. With your first computer, conduct your interview via a video conferencing tool such as Zoom or Skype. On the second computer, capture the audio and video from your first computer’s display into your live tool. You can then broadcast that to Facebook Live.
Internet Connection
A fast Internet upload speed is important for broadcasting live video. For best results, you’ll need an upload speed of at least 10 Mbps to ensure that the highest-quality video and audio will come through. Facebook Live requires a minimum of 3-4Mbps, but your internet connection can vary a lot - so it's always good to have some wiggle room! If you have a co-host or guest broadcasting video to you via Skype or Zoom, their upload speed should also be 10 Mbps or higher (ideally).
As with everything, testing is important. While some people have had success with slower speeds, you’re likely to get poor results with upload speeds less than 5 or 6 Mbps. To check your upload speed, use a speed test tool such as Speedtest.net before you go live each time. Speedtest also offers desktop apps for Mac and PC.
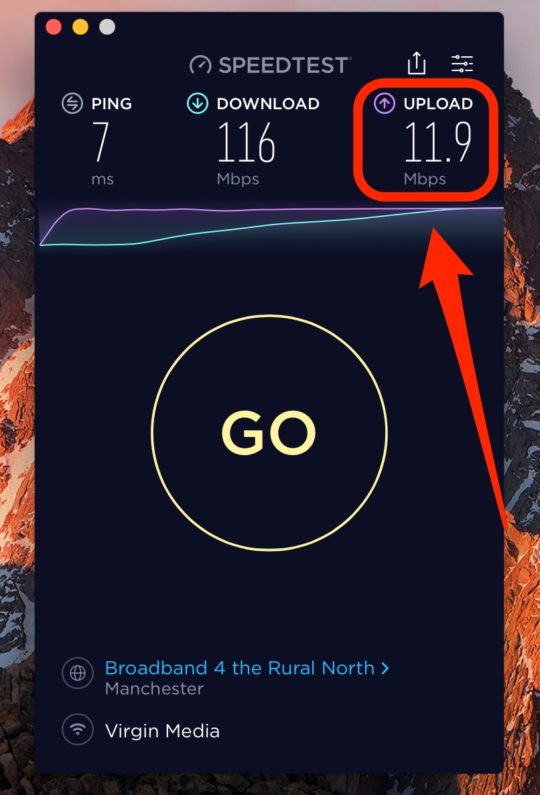
Check your Internet upload speed with a tool like Speedtest.
Webcams and Microphones
You can use an integrated webcam and microphone, but to greatly improve the broadcast quality, invest in an external webcam and microphone. I recommend starting with a simple webcam such as the Logitech C920 or C922. To take things to the next level, consider getting a dedicated video camera and connecting it to your computer via an HDMI capture card.
There are many good USB microphones to choose from, including the Blue Yeti Microphone, Samson Q2U Dynamic USB Microphone and SE Electronics X1 USB microphone ($299). If you have the budget, the Heil PR-40 microphone ($327) is one that professionals use. Make sure that you use earphones while you’re broadcasting to help minimize feedback.
Lighting
You might be able to get away with the natural light of your room and some standard lighting. But if you add two or three softboxes, it can make a big difference in the quality of your broadcast. You can choose from many softbox options, such as the StudioFX Lighting Kit ($126). The one I use is the Neewer 3x Bi-color 480 LED Lights. Because they're LED lights, they take up less room and don't make the room so hot.
You might also investigate light rings. Just be aware that they can cause a reflection if you wear glasses.
#2 Choose Your Live Tool
If you have a co-hosted or interview show, you’ll need to choose a live video broadcasting tool that allows you to bring another person in.
There are lots of different classes of tools, including desktop apps, web apps and even hardware soltutions.
Web Apps & Webinar Platforms
Web apps such as BeLive, Lightstream and Crowdcast offer this functionality through your web browser. Some webinar platforms such as WebinarJam or Zoom allow you to broadcast your webinar to Facebook Live.
BeLive lets you show up to three people on-screen at once.
BeLive makes it easy to broadcast co-hosted or interview shows to Facebook Live. You can invite your co-host in and have up to three people on the screen at one time. Check out this walkthrough on how to use BeLive for a co-hosted or interview show.
Desktop Apps
For more power and flexibility, you’ll want to use a dedicated live broadcasting tool.
OBS Studio is an excellent free open-source tool for Macs and PCs.
Mac users may want to check out the powerful, yet inexpensive tool, Ecamm Live ($39.95). Mac users also have a higher-end live video tool to try, called mimoLive which starts from $199 per year.
Wirecast is a professional tool with a rather professional price tag, starting at $695. This is available for both Macs and PCs.
For PC users only, the professional vMix software has a free version and paid versions from $60 to $1,200.
Why would you use a dedicated app such as OBS Studio or Wirecast? They all let you set up your whole show ahead of time. Your show may have different scenes such as a pre-show segment, an intro reel, a split-screen interview shot, multiple camera angles, and more. These tools let you set up those features before your show.
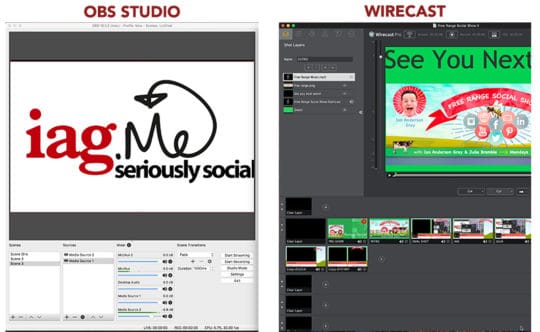
OBS Studio and Wirecast both let you broadcast a Facebook Live show via desktop.
When you’re live, you can then switch between scenes and even set up slick transitions. You can add as many webcams, microphones, images, videos, and screen shares as you like and integrate your own branding.
OBS Studio and Wirecast are available for Mac and PC. Ecamm Live and mimoLive are Mac only. vMix is PC only. All these tools allow you to broadcast to just about any live video platform including Facebook Live, YouTube, and Periscope.
OBS Studio
OBS Studio is free and available for both PC and Mac. It’s a powerful tool, especially when you consider it’s free. The interface isn’t intuitive at first, but once you get going, it’s fairly easy to create your show.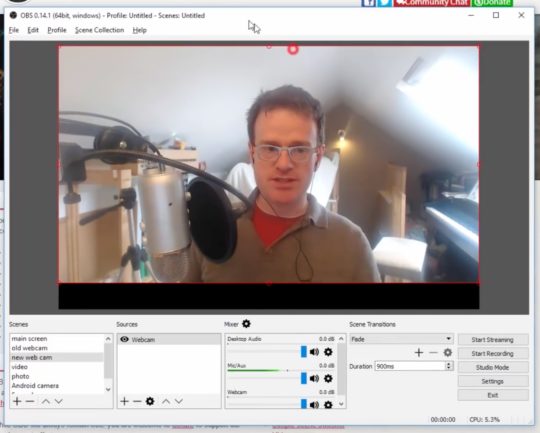
OBS Studio is a free tool that lets you manage your Facebook Live broadcasts via desktop.
You can add multiple sources (including webcams, microphones, and media files) and share your screen. Unlike Wirecast, you can broadcast to only one live video platform at a time.
If you’re a Mac user, you’ll need to install additional software to capture the audio from Skype or Zoom. Here are some tools that will route your audio to OBS Studio on your Mac:
- Soundflower (free)
- Sound Siphon ($39)
- Loopback ($99; my recommendation)
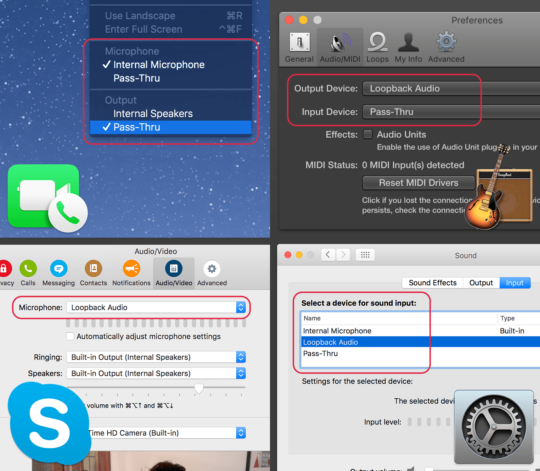
Loopback lets Mac users route the audio from Zoom or Skype to OBS Studio to capture a co-host’s audio.
Check out this detailed walkthrough of how to use OBS Studio to broadcast to Facebook Live.
Wirecast
Like OBS Studio, Wirecast works on both PC and Mac. The standard version costs $695.
You can download a fully functioning demo from the Telestream website. The demo version has a watermark and a demo audio voiceover, but you can use it to follow along with this article.
Wirecast is a more robust and professional live video tool than OBS Studio. In my experience, it doesn’t require as much of my computer’s resources as OBS Studio does.
Wirecast is a professional tool for managing Facebook Live broadcasts on desktop.
With Wirecast, you can broadcast to multiple live video platforms at once (e.g., to Facebook Live, YouTube Live, and Periscope). You’ll need a powerful computer for this, though.
Wirecast lets you broadcast live to multiple platforms.
Wirecast connects directly with the Facebook API, which means you can create your live video post in Wirecast and publish or schedule it to your Facebook page, profile, group, or event. You can also see how many live viewers are watching and monitor reactions during your live videos.
Wirecast has a cool feature called the Wirecast Virtual Webcam and Microphone, which will output the audio and video of your live show as a virtual webcam and microphone. Selecting this microphone and webcam in Skype or Zoom will allow your co-host to see and hear the live show in real time.
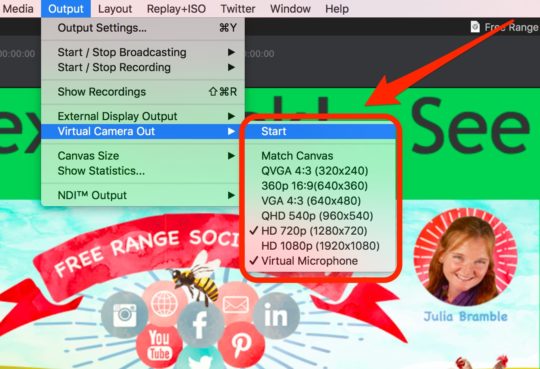
Wirecast lets you output the audio and video from your live show as a virtual webcam and microphone.
Video Conferencing Software
Some live video tools such as vMix, Wirecast and Ecamm Live allow you to bring your guest into the show directly. Others, such as OBS Studio don’t.
Ecamm Live integrates with their sister-software, Skype Call Recorder. So you bring your guest in via Skype, and it's very easy to set up.
Wirecast has a guest feature called Rendezvous. You send your guest a special link, and their webcam is captured in their browser. It's still in its early days, so I prefer to use Skype or Zoom.
Either way, you can get more flexibility if you chat with your co-host in your favorite video conferencing tool, and then capture the video and audio from Skype or Zoom into your live tool (such as Wirecast or OBS Studio).
Skype is the most well-known video conferencing tool, and it’s free. I use Zoom to bring in my co-host, Julia, to our live show, because I’ve found it provides better quality and is more reliable. Zoom is free for up to 40 minutes. For unlimited use, you’ll need to upgrade to a paid plan, starting at $14.99/month. You may also want to check out Amazon’s free conferencing tool, Chime.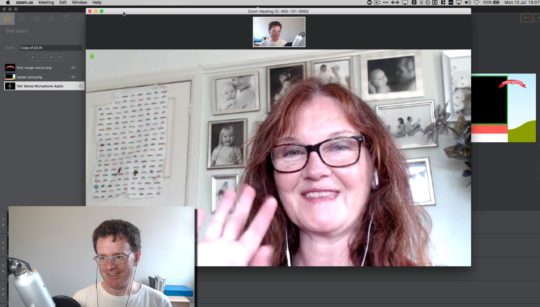
Zoom is a video conferencing tool you can use to bring a co-host into your Facebook Live show.
#3 Set up your Scenes
Now it’s time to set up the scenes for your show. I'll be focussing on how to do this using Wirecast. But the set up is very similar no matter what tool you use.
When you launch your first show, it’s best to start with just a few scenes. Then as your confidence grows, you can add more scenes as needed.
Think of a shot or scene as your stage. The scene might contain the following elements:
- A backdrop (an image or background color)
- People (you and your co-host, brought in via Skype or Zoom and your webcam)
- Other layers such as titles, logos, graphics, videos, music, and more
Wirecast calls these shots, and OBS Studio and Ecamm Live call them scenes.
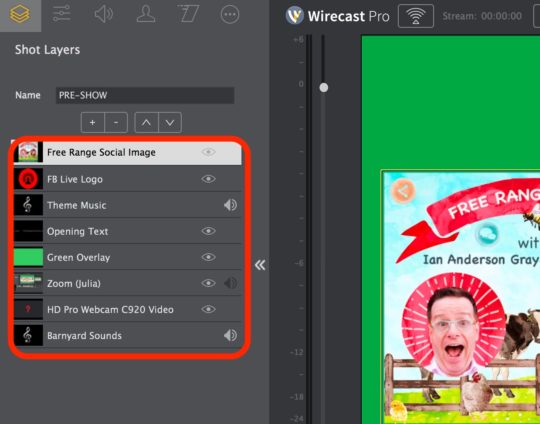
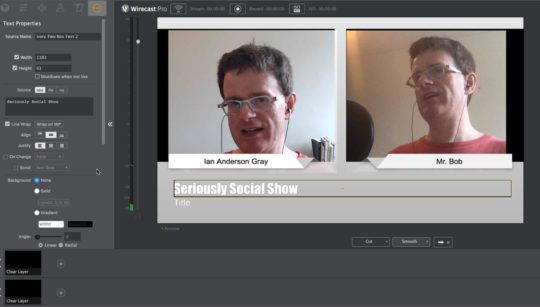
Set up shot layers for your Facebook Live show in Wirecast.
A basic co-hosted show might have just one scene: your webcam and your co-host brought in via Skype or Zoom. A more advanced setup may contain multiple shots, as in the example below:
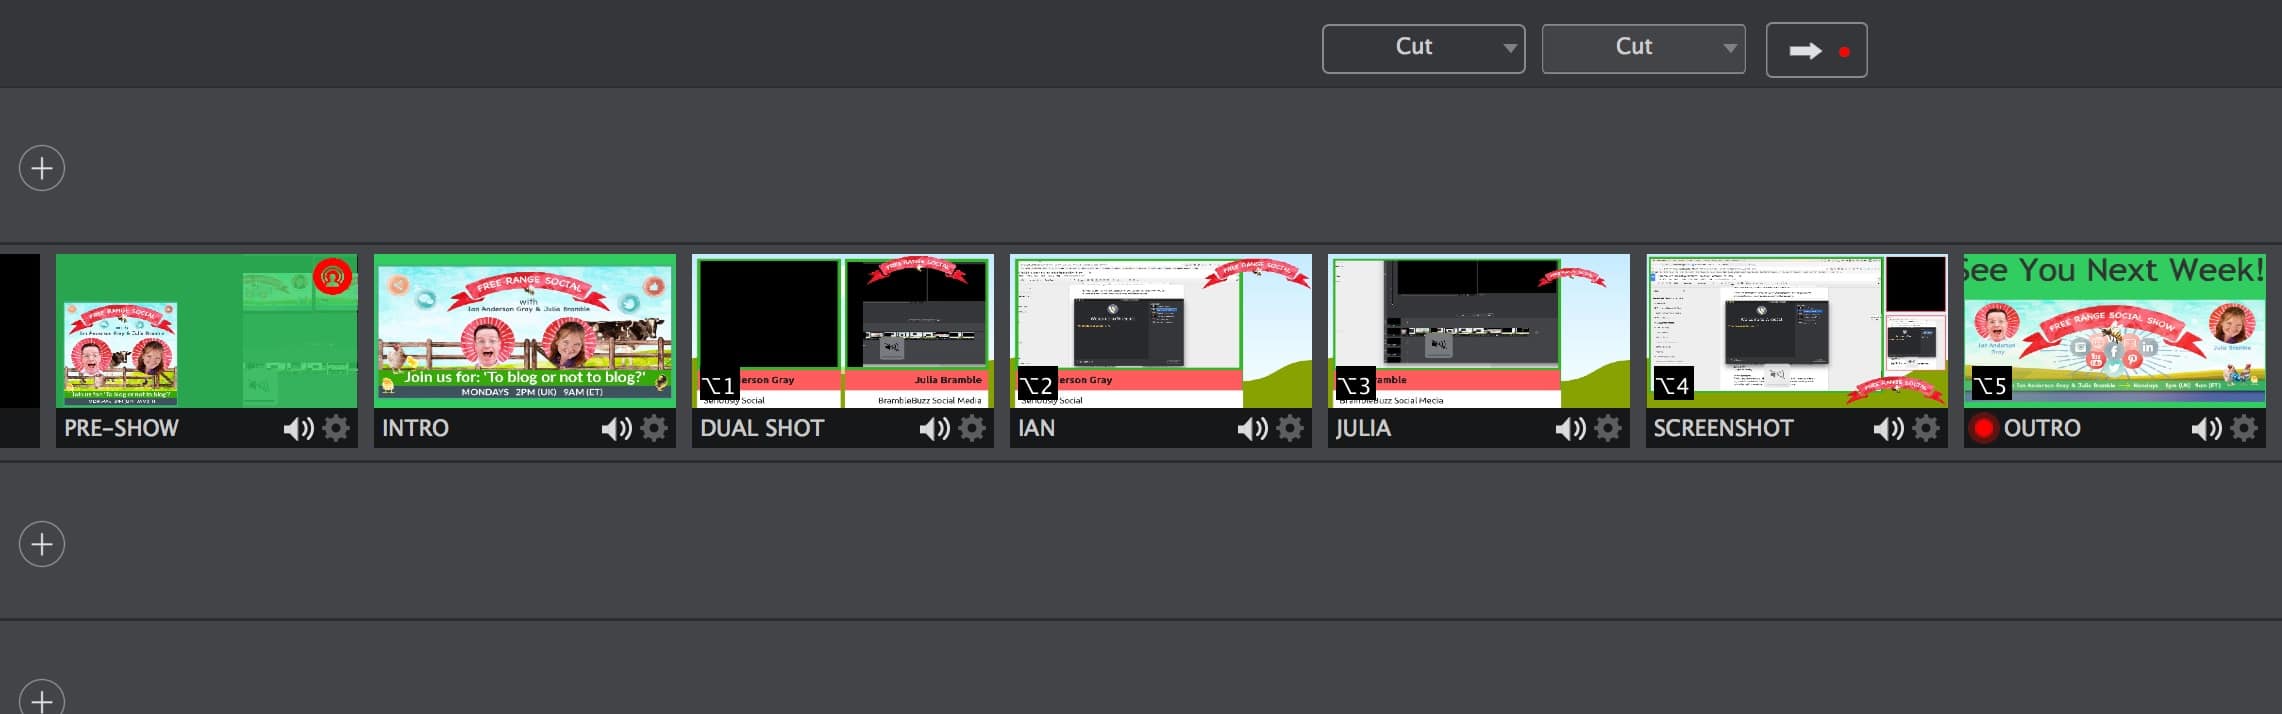
More advanced setups might include multiple shots for a Facebook Live show.
Now let’s look at some scenes you might want to set up for your show.
Shot 1: Pre-Show
The first people to see your show won’t be live viewers; they’ll be replay viewers. In this shot, you can welcome viewers to the show, while Facebook builds an audience for you.
There are a few ways to set up a pre-show shot. This shot might show you, or both you and your co-host. To make this shot a little different, you can add a transparent overlay and some text. Or you could add your webcam, branding, and a countdown timer, such as in this example from Live Streaming Pros.
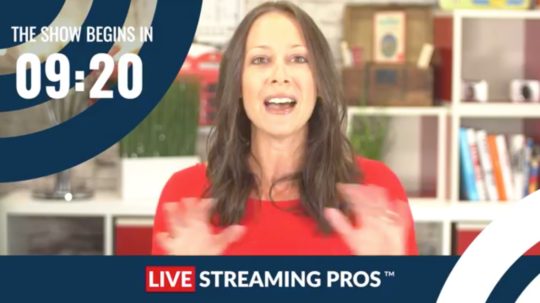
This Facebook Live pre-show shot includes branding and a countdown timer.
Shot 2: Intro (With Music)
When you’re ready to start the main show, you might play an opening video to give the show a professional feel and reinforce your brand.
You can use a tool such as Wave to create this video. Or you could add a static image and play some music; Canva is a good tool for creating this content. Make sure you choose royalty-free music for this purpose. Facebook can quickly detect copyrighted music and you could find yourself banned.
For the Free Range Social Show, we use a show image (created from a pre-designed template) and royalty-free music for the theme song. We commissioned a voiceover artist from Fiverr (for the cost of $5) to record the opening words.
Shot 3: Dual Screen
For co-hosted and interview shows, this is the most important scene. You want to display you and your co-host in the same shot, side by side.
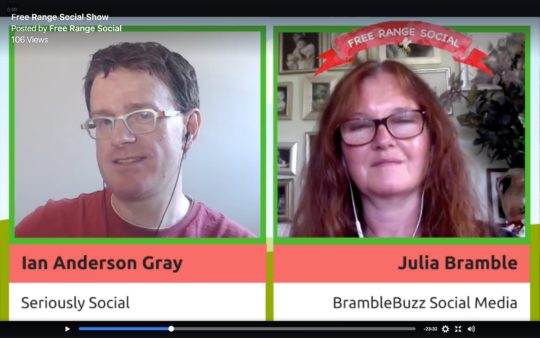
Set up a dual shot that will show both you and your co-host on-screen.
This shot is easier to manage if you have two displays. For example, use display 1 for Wirecast and display 2 for Zoom or Skype. Then capture the video and audio from Zoom or Skype into Wirecast.
Capture your co-host from Zoom or Skype using Wirecast.
Shots 4 and 5: Single Shots
To add more variety to your show, create single shots. Show just your webcam and just your co-host. When only your co-host is speaking, transition to the shot that shows your co-host only. Then return to the split screen for more conversational segments.
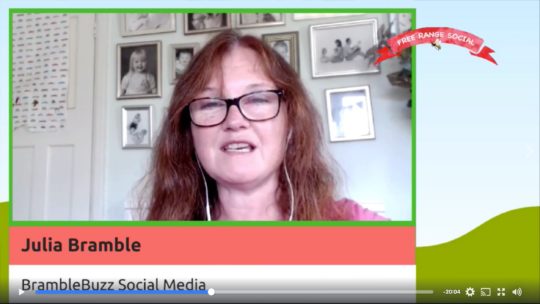
Create several single shots for your Facebook Live show.
Shot 6: Screen Share
In this shot, share your screen or the window of an app running on your computer. This works well if you want to broadcast a webinar using PowerPoint or Keynote, share websites via your web browser, or share another app on your computer.
This scene lets viewers see you and your co-host while you’re demonstrating. Add your webcam and your co-host from Skype or Zoom as small thumbnails.
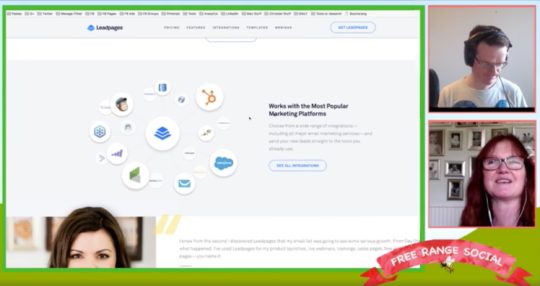
Set up a shot to display the demonstration, as well as you and your co-host.
Shot 7: Smartphone Screen
If you want to chat about a smartphone app, share your phone’s screen using a screen share app. I use Reflector 2, which is compatible with PC and Mac and works with both iPhones and Androids. Another cross-platform option is AirServer.
If you’re a Mac and iPhone user, you can use QuickTime to capture your iPhone’s screen via cable.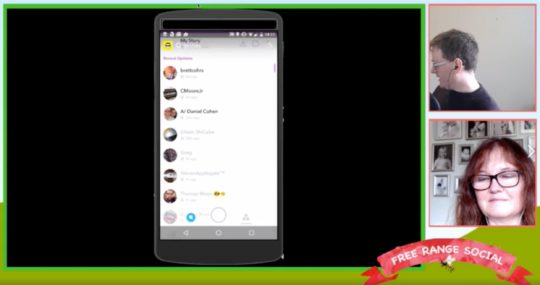
Set up a shot to share your smartphone’s screen during your Facebook Live broadcast.
Shot 8: Outro (With Music)
To end the show, use the same video as before or create a different one. It’s good to end the show with a call to action and another reminder of when your next show will air.
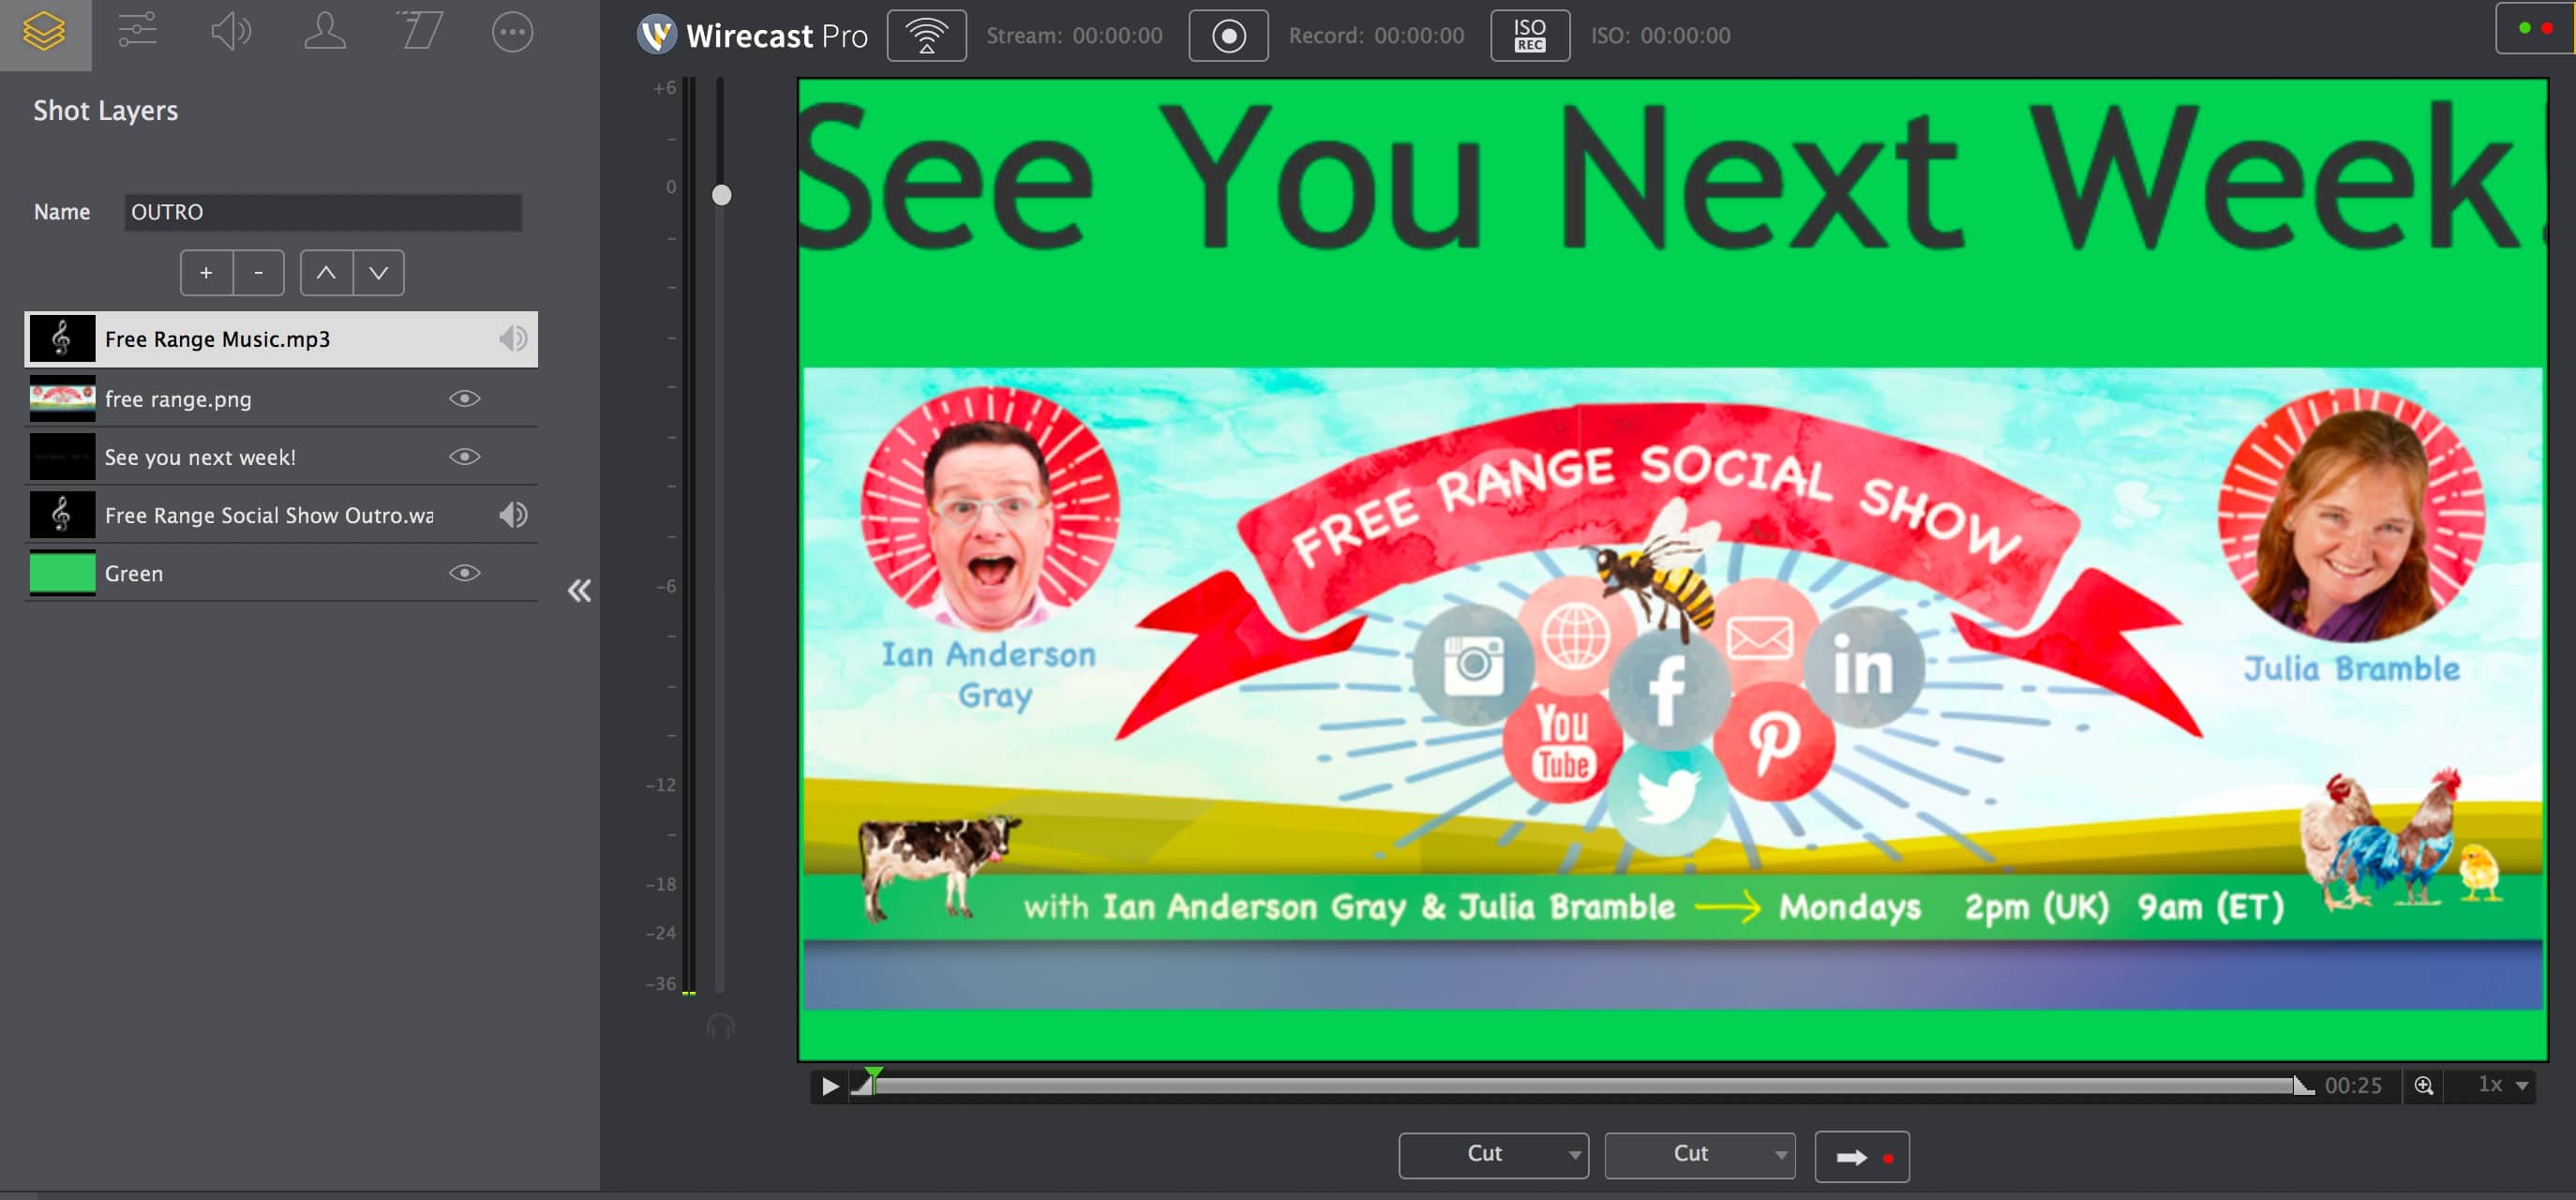
In your outro shot, remind viewers when your weekly show airs.
#4 Schedule Your Show the Week Before
You can set up a live video up to a week before it starts, which gives you lots of time to promote it. You can schedule the show from most live video tools or from Facebook.
Via your live video tool
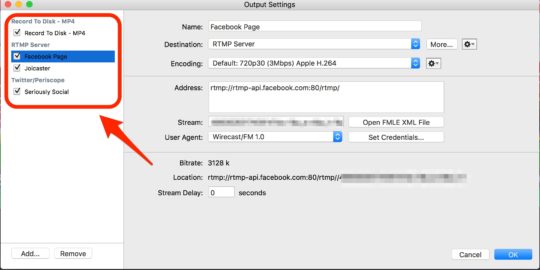
If you’re using a tool such as Wirecast, vMix, Ecamm Live or mimoLive, you can schedule directly through the tool. Wirecast lets you create a scheduled broadcast to your Facebook page, profile, group, or event.
To do this, click on Output Settings, add a new destination, and select Facebook Live. Then choose your page, enter your show’s title and description, and set the date and time.
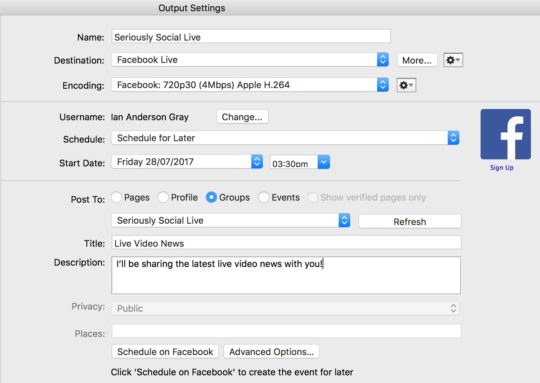
Schedule your Facebook Live show in Wirecast.
Via Facebook Publishing Tools
You can also schedule your show directly on Facebook for Facebook pages. You’ll need to choose this method if you want to broadcast to multiple destinations (e.g., Facebook Live and YouTube Live) or if you’re using OBS Studio.
To schedule your show, go to your page and click on Publishing Tools.

Open your Facebook page and click Publishing Tools.
Then click on Videos in the left menu.
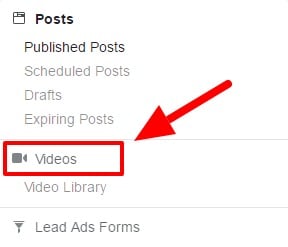
Select Videos on the left side of the screen.
At the top right, click the + Live button.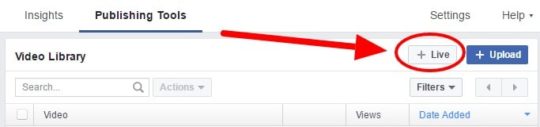
Click + Live to schedule your live video.
In the window that opens, enter your show’s description and the title of the video. Also, add some tags that describe the show.
In the bottom-right corner, click the drop-down arrow to the right of Go Live and select Schedule Live.
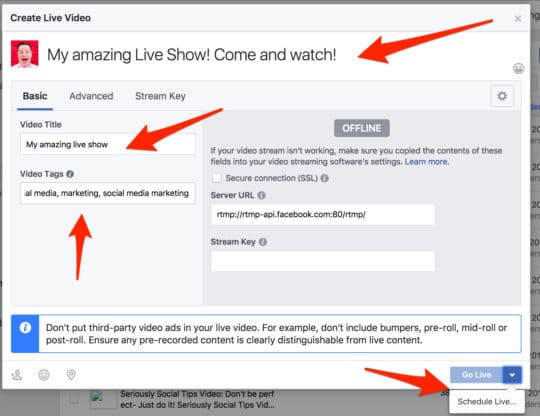
Add a title and tags to your Facebook Live broadcast.
On the next screen, enter the scheduled date and time. Optionally, you can upload an image for the show. I find the default (the logo for our Facebook page) works well.
When you’re finished, click Schedule. Your live show is now scheduled on your Facebook page for all to see. Be sure to start promoting your live show on social media.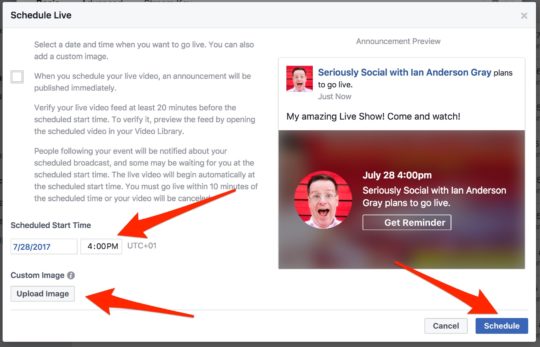
Enter a start time to schedule your Facebook Live show.
#5 Test Your Setup on the Day of the Show
On the day of your live show, make sure everything is set up correctly. About 60 to 90 minutes before the show, perform the following pre-show checks.
Check the Background
Look at the view from your webcam. I’m sure your room is already tidy, but be aware of what your live viewers will see.
Restart Your Computer
This can help you avoid potential glitches before your show. Also, if possible, use a wired Internet connection instead of Wi-Fi.
Close Down Background Apps to Free Up Memory
Once your computer has restarted, close as many apps running in the background as possible. (Mac users should properly close using Command+Q.) Some apps such as Dropbox and Google Drive can use a lot of bandwidth and resources.
After you’ve closed down apps, check how much memory is available and how busy your processor is. PC users can check this with Task Manager. To open Task Manager, hold down the Ctrl and Shift keys and press Esc. Click CPU at the top of the first column to sort the apps based on CPU usage. Close down unneeded apps that are using a lot of precious resources.
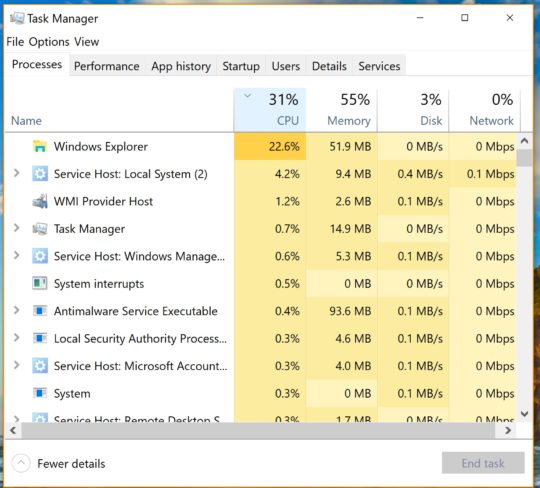
Use Task Manager to check which apps are running on your PC.
Mac users can use Activity Monitor (choose Applications > Utilities > Activity Monitor). Scroll down and see if any unneeded apps are running. Double-click on an app for more information and to quit the app.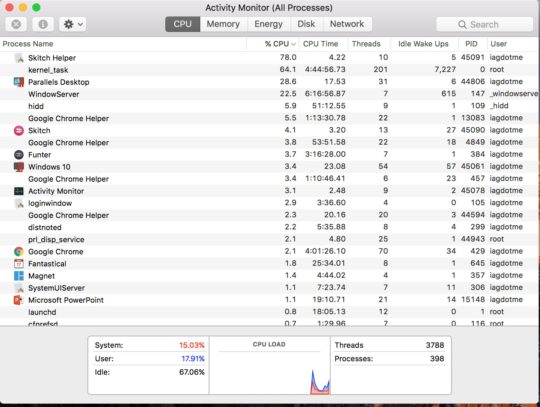
Open Activity Monitor to see which apps are running on your Mac.
If you’re using a Mac, the free Memory Clean 2 app can help free up memory. Just run it and click Clean to free up precious RAM.
Free up RAM on your Mac with Memory Clean.
Mute Phones, Alarms, etc.
Remember to mute devices around your office or home, including alarms, phones, landlines, and more. You don’t want to be rudely interrupted by a client or friend in the middle of your broadcast.
If possible, switch off devices or place them in airplane mode so they’re not taking up Internet bandwidth. Politely ask anyone in your office or home to refrain from streaming video during your broadcast.
Test Your Internet Speed
Check your Internet connection and speed before you go live. Ensure you have an upload speed of 10 Mbps or higher (5 or 6 Mbps at the very least).
Launch Your Tools
Launch your video conferencing tool (Zoom or Skype). Your co-host doesn’t need to join the call yet, but you can check that the show is set up in Wirecast or OBS Studio.
Now re-open Wirecast or OBS Studio and open your show.
Check Your Shots/Scenes
Make sure all of the shots/scenes are set up correctly. In particular, check that webcams, microphones, and screen shares are displaying and receiving correctly.
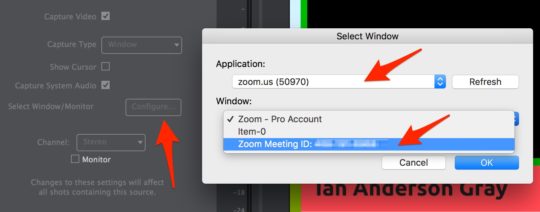
Select Zoom window to capture your Facebook Live co-host.
You’ll need to select your Zoom or Skype window again for your co-host view. To do this, select the Zoom shot layer and click Screen Capture Properties. Then next to Select Window/Monitor, click Configure. In the pop-up window, select Zoom or Skype as the application and click OK.
Make sure you’re using headphones or earbuds. This greatly improves the audio quality and stops any potential feedback.
#6 Go Live
After you’ve checked your setup, you’re ready to take these steps to go live.
Start the Broadcast
I recommend streaming to Facebook at least 30 minutes before your live show so you can check that the technical end is working. To do this, find your scheduled live post on Facebook and edit the post. You’ll see a preview window with the stream URL and key.
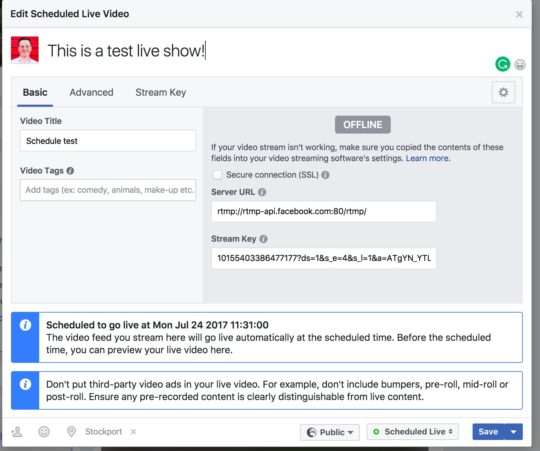
Preview your live show on Facebook.
If you scheduled the live show from Facebook, copy the stream address and key from the preview window.
Next, open Output Settings in Wirecast. Add a new destination and select RTMP Server. Paste the stream address and key into the window.
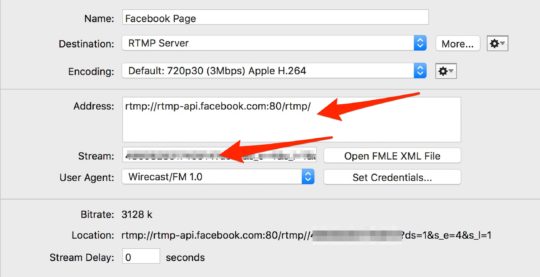
Set up an RTMP stream in Wirecast.
Then click the broadcast button in Wirecast to start broadcasting to Facebook.
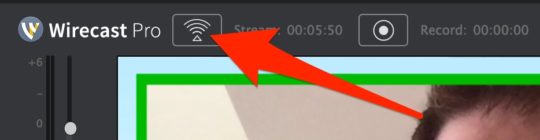
Start broadcasting your live show in Wirecast.
Facebook will start receiving your broadcast stream from Wirecast, and you’ll see this message displayed in the preview window:
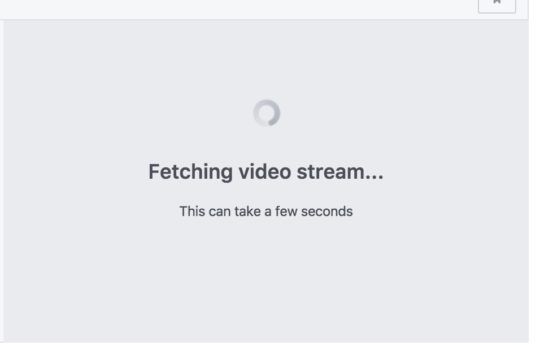
Facebook shows this screen while it’s receiving your broadcast from Wirecast.
After a few seconds, you’ll see a preview of your stream in the window.
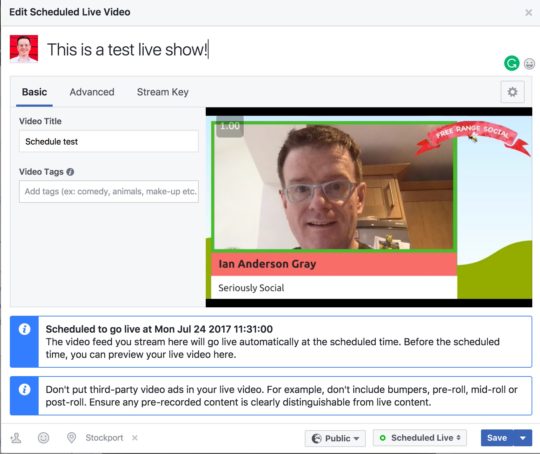
Preview your Facebook Live broadcast before your show.
Ask Your Co-Host to Join
Now have your co-host join you on Skype or Zoom. Give yourself time to check the settings. Make sure the video and audio are being captured within Wirecast or OBS.
Go Live!
A few minutes before you go live, Facebook should start displaying a countdown timer in the preview window. It’s not long now!
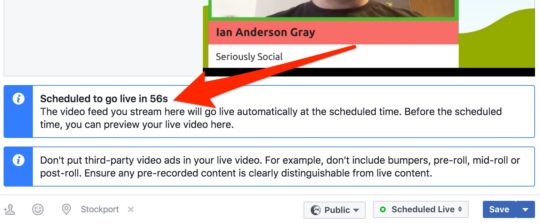
Facebook shows a countdown clock before your live broadcast begins.
Be aware that Facebook doesn’t always make it clear that you’ve gone live when the countdown timer reaches zero. Have your smartphone on hand to check that you’re indeed live.
When you go live, start with the pre-show shot and greet your replay viewers. You can then switch to your intro shot, which may include your logo, intro video, and music.
Then move to either your dual shot or single shot to start the show. As the conversation progresses, you can switch between single and dual shots, and if needed, your screen share shots.
At the end of the show, switch to your outro shot and end the broadcast.
Conclusion
Taking the time to set up the technical end of your Facebook Live show is vital when broadcasting from your desktop. Follow a checklist to ensure everything runs smoothly and you’re producing a professional show.
Once you’ve finished your broadcast, that’s not the end of it. Your video will now be viewed by replay viewers. It’s important to continue the conversation and promote.
What do you think? How do you prepare the technical aspects of your Facebook Live show? What tips can you offer? Please share your thoughts in the comments below.
About Ian Anderson Gray
 Ian is the founder of the Confident Live Marketing Academy and is the host of the Confident Live Marketing Podcast. He helps entrepreneurs to level up their impact, authority and profits by using live video confidently. He's a geek, husband, and dad to two kids, and trained as professional classical singer. He lives near Manchester in the UK. Find out more
Comments