
8 Steps to Build Brand Awareness with Short Domains
Your business may have several social profiles- Facebook, Twitter, Instagram or LinkedIn. As well as promoting your own content (such as videos, articles or products), you’ve seen the importance of sharing other people’s content so that you are seen as a “go-to” source of quality and exciting content in your sector.
However, how do you go about creating more brand consistency across all these networks with all these different links?
One of the best ways is by using a custom-branded short domain. This way, your followers and fans will see your brand name in every link you post. Branded short links are well worth the effort:
- They build brand awareness
- They allow you to track clicks across all your networks, no matter which tool you use to post.
A Brief History of the Short URL
Firstly, what do we call them?
- Short URLs?
- Short Domains?
- Short links?
Well, they're all the same thing. Technically a domain name is part of a link or URL (the bit after the http:// or https:// and before the first slash), but don't worry- let's not get too pedantic about this!
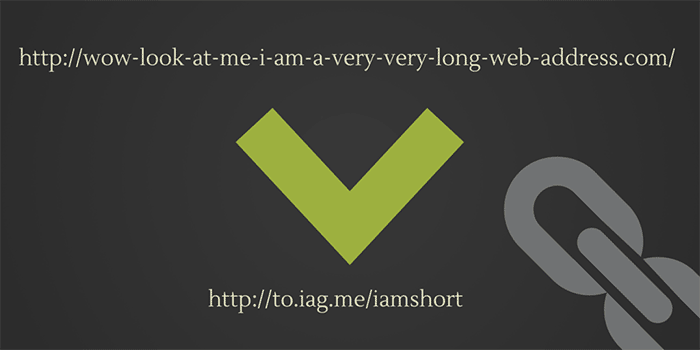
URLs can be short, but sometimes they can be long. For example, this website has a short url:
https://iag.me/
...that is just 14 characters (including the http:// and the final backslash). However:
https://iag.me/socialmedia/20-twitter-tools-will-turn-twitter-power-user/
...is a lot longer.
Historically this mattered with platforms such as Twitter which has a character limit of 140 characters per post. In some cases, the URL could be longer than the tweet itself!
Not long after Twitter launched, URL-shortening services sprung up (for example tinyurl.com). They would shorten the long url to a much shorter one. When someone visits this short URL it redirects you to the long URL.
In time, some URL shortening services added extra features which would give you basic tracking information to show you how many people clicked on a link.
In 2010, Twitter started automatically shortening links themselves, which made it easier for everyone to use short URLs and not use up those precious characters with a link! In 2011, Twitter made some improvements, and now Twitter shortens all links with their t.co URL shortener. It is important to point out that Twitter doesn’t always visibly shorten the link to a t.co url. You can see at least part of the link:
If you post a link of an already shortened URL, Twitter will display this link. However, it will actually direct you to its short link using t.co. This will then redirect to your short URL, which will then direct to the final URL. It’s important to know this, because it is possible to display your branded URL whilst being able to analyse click-throughs via Twitter Analytics and the analytics via your custom URL shortener
A branded short domain allows you to use a custom domain instead of the standard URL your URL shortener uses. For example, instead of http://bit.ly/ZtLjZm you could have http://to.iag.me/ZtLjZm
Enter bitly
So, how do you go about creating a branded short domain? The answer is bit.ly, and the great thing is it’s free!
How to set up a short domain with bitly
It doesn't have to be complicated! I've listed 8 steps to make it happen, and the 8th step is optional!
 #1 Find & register your short domain
With so many domain name extensions and so many possibilities, it can be a nightmare to try and find that perfect short domain. You’ll probably find that many of the ones you first look at are already taken. However, don’t despair- remember this is a short domain, and so it doesn’t have to match your brand perfectly. For example, I was looking for a short domain for my web agency, Select Performers. I was hoping for a short domain such as select.io or sele.ct or similar, but I had no joy. In the end I came up with select.social. Not particularly short, but the shortness of the domain doesn’t matter so much since Twitter shortens links so they only take up 22 characters (or 23 for secure https links).
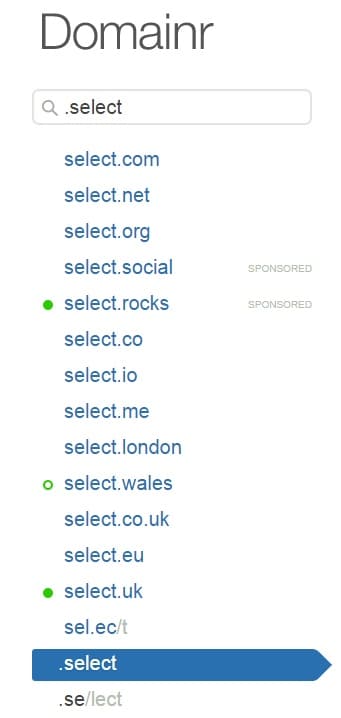
Probably the most useful service I have come across is domainr.com (in fact it is a service mentioned by bitly themselves). Just enter your normal domain or brand name, and domainr will come up with a wealth of possibilities.
You don’t actually register your domain through Domainr, but it gives you a list of registrars for each domain. It might be that you can register the short domain you want through your favourite registrar, but it won’t always be the case. There are different registrars that are in charge of each domain name extension and there may be restrictions for certain ones. For example, some country level domains (such as *.no) will only allow you to register if you live or have a business registered in that particular country.
In my case I already have a short domain name for my website (iag.me), so I decided to use a subdomain for my branded short domain- to.iag.me.
#2 Set up the DNS
Once you’ve registered your short domain, we need to point it to bitly’s servers so that bitly can use our short domain name instead of the standard bit.ly one when we shorten links. The registrar that you registered the short domain should offer you a way of editing the domain’s DNS (domain name system) settings. Every registrar will have a different set up, but you should be able to find out through their support pages. If in doubt, ask them!
You will want to point the domain’s “A record” to the bitly server’s IP address. This is currently 69.58.188.49. The A record of a domain is the setting that tells your browser which server in the world is serving content for that domain. There are other types of records such as MX for email and NS for name servers, but don’t worry about that for now.
You probably won’t want to set up a short domain with “www.” in it- just the naked domain without the www prefix. The way you set this up will depend on your domain name registrar’s control panel. It might require you to put the domain name followed by a dot as the domain name (for example select.social.). Or it might require you to enter an asterisk in this field, which will point anything before the domain name (including nothing) to point to the IP address.

If you’ve chosen a domain name with a prefix (i.e. a sub domain) such as to.iag.me, then you’ll need to add a CNAME record instead of an A record. This is a similar set up, just choose CNAME instead of A, and add cname.bitly.com instead of the IP.
If you have an option to set the TTL then choose 3600. TTL stands for time to live, and is the number of seconds this domain name setting will be cached for by domain name servers around the world. It’s good to start off with a low number so we don’t have to wait too long for bitly to see the new settings. Once you’re all set up, you can change this to a higher number such as 14400 (4 hrs).
#3 Wait
Once you’ve done this you’ll have to wait. If your domain name has been fully registered then you may still need to wait an hour or two for your domain name changes to propagate to all the domain name servers round the world. In some cases this might take as long as 24hrs.

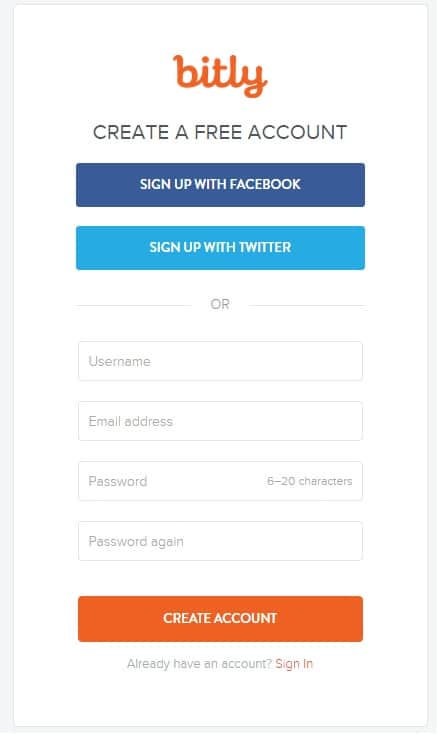
#4 Set up bit.ly account
First of all, head on down to bit.ly, click on “sign up” and create an account. You can sign up via Facebook or Twitter, or you can create an account the standard way by using a username, email address and password. You choose- it’s up to you!
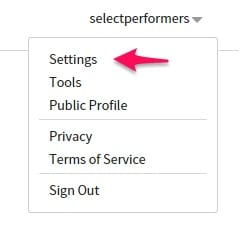
#5 Visit bitly settings
Once you’ve created your account, click on your account name on the top right of your screen and click on “settings”.
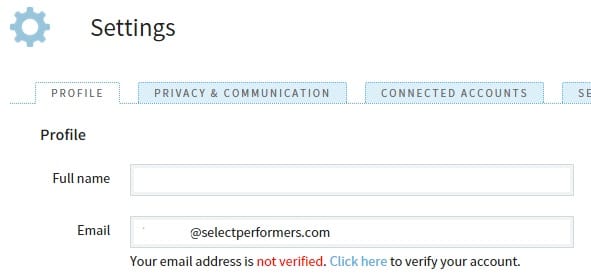
#6 Check your details and verify your email address
Once you’re in bitly’s settings, just make sure you have verified your email address and entered your full name. Once you click verify you will be sent an email to check your email address is valid.
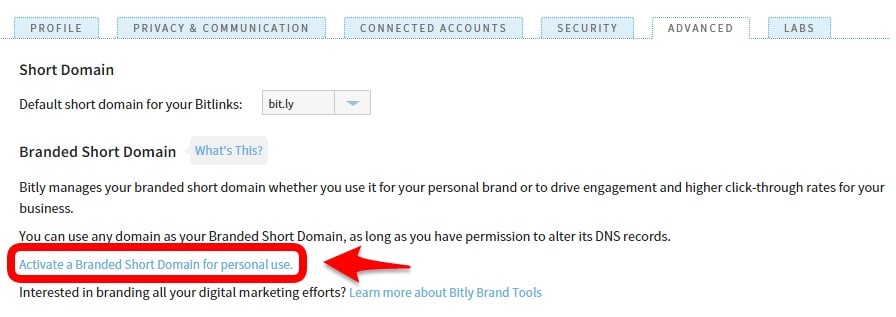
#7 Activate your branded short domain
Once you’ve validated your email, click on advanced. You have a number of settings, but first we want to set our short domain, so that bitly will use that instead of the standard bit.ly domain. Under the heading “Branded Short Domain”, click on “Activate a Branded Short Domain for personal use”.
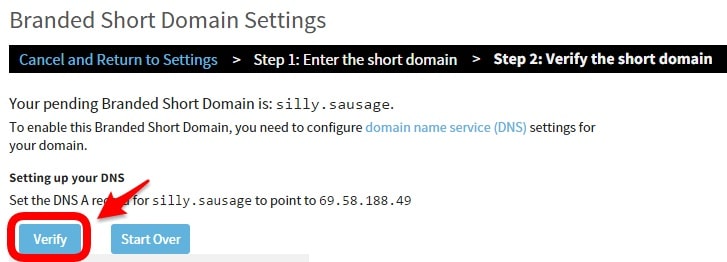
Now enter your short domain in the box and click Add.

You’ll now be asked to verify your short domain to check that the A or CNAME record is set up correctly. If you’ve waited and the settings have had time to propagate, you can click verify and everything should be set up. If bitly can’t see the new settings, you may need to wait a little longer and try again.
#8 Add a tracking domain
This part is optional, but I highly recommend it. If you add your website or blog’s domain as a tracking URL, you can track how many users are creating links for pages on your website. You can also see how many click-throughs there are, which services these visitors have come from (eg Twitter and Facebook) and where in the world these users are located.
![]()
Once you click add, you’ll then need to verify your website. You have a number of choices, and you’ll need to see which one is easiest for your website. If you can add a meta tag to your home page, then that’s probably the easiest, but you may find adding an HTML page easier or add a CNAME domain name record.
![]()
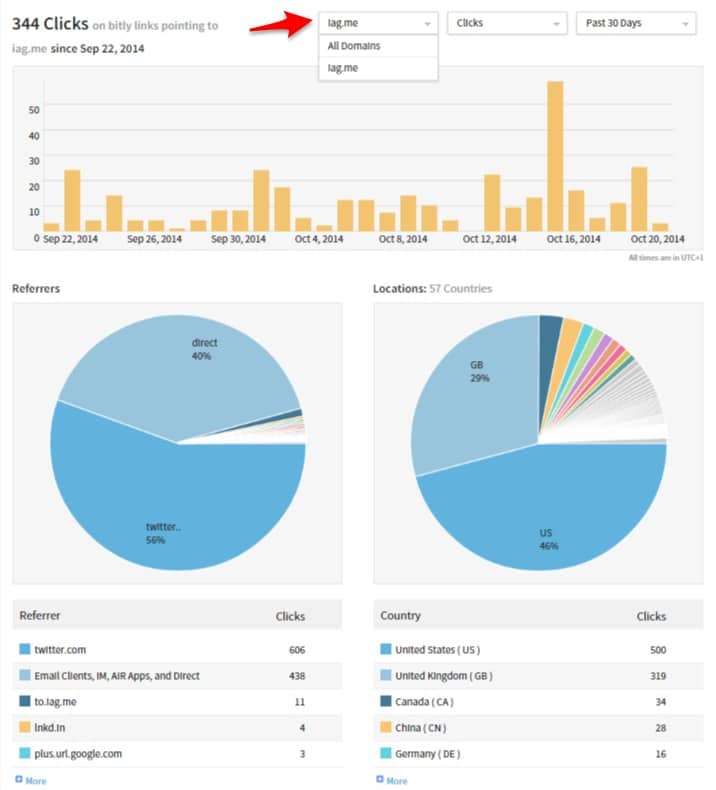
Once you’ve done that, you can view some powerful statistics on click-throughs to your website over the past 30 days:
Adding your Short Domain to your Social Management Tools
Now that you've set up your branded short domain, you can now go ahead and add it to your social media management tools. Not all support bitly, but many do including Buffer, SproutSocial, Friends+Me and MeetEdgar.
Buffer
Social Media tool, Buffer integrates really well with bitly. You can even select a different short domain for each social media profile using separate bitly accounts. I’ve got my short domain to.iag.me set up on my Seriously Social social profiles such as @iagdotme on Twitter and iagdotme on Facebook and Google+. I’ve also got a different short domain, select.social for my Select Performers social profiles such as @select on Twitter and Select Performers on Facebook and Google+. There are very few other social tools that offer this type of flexibility.
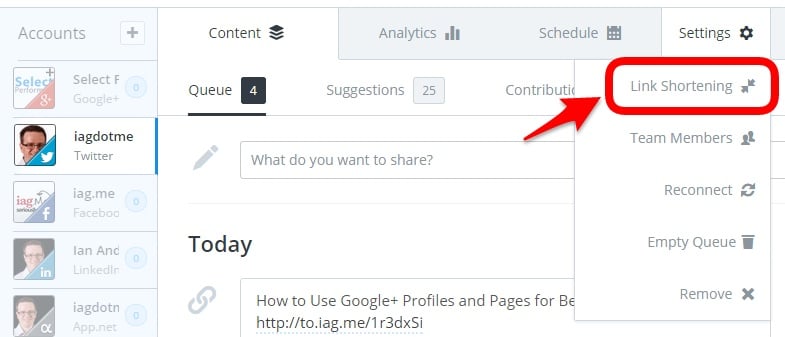
It’s very easy to use your short domain in Buffer. First of all, select the social account you want to add your short domain to, click settings and then “link shortening”:
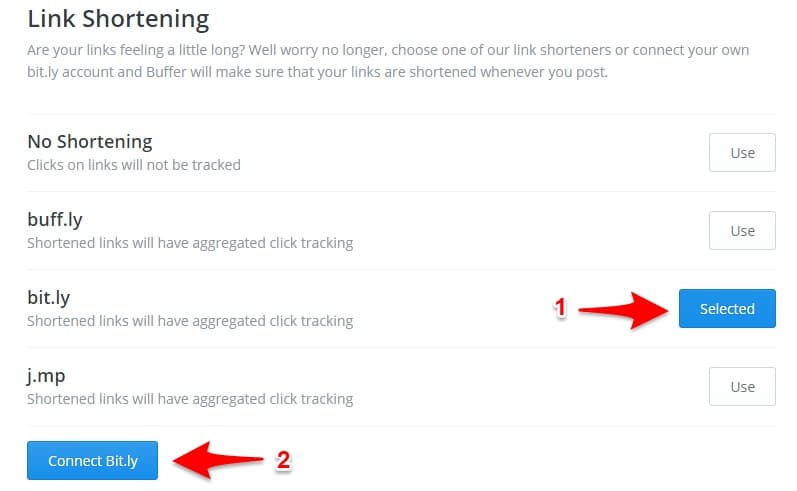
Then click on the “use” button by bit.ly and connect “Connect Bit.ly”:
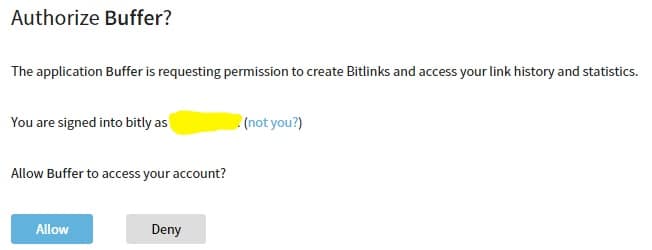
You’ll then be presented with a screen asking you if you want to authorize Buffer to connect to and use your bit.ly account. If you’re not logged into your bit.ly account you’ll be asked to log in first. When you click “allow”, Buffer will be able to shorten links using your bit.ly account. Buffer doesn’t need your bit.ly username and password to do this which is important for security.
That’s it! You’ll have to repeat this for any other social accounts in Buffer where you want to use your custom domain.
Friends+Me
Friends+Me is an amazingly powerful tool that converts Google+ into a social media management tool. You can selectively cross-post from your Google+ profile or page to your other social networks (such as Twitter, LinkedIn profile/groups/pages, Facebook profile/groups/pages, Tumblr and more). Friends+Me, like Buffer, allows you to use a different bit.ly account for each social account. That means you can use the same custom short domain for all your accounts or different ones. As with Buffer, I’ve got two custom domains- to.iag.me and select.social set up on different social accounts.
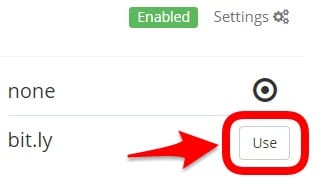
To use your custom domain with an account in Friends+Me, select the account and then click on settings and then “Link Shortening”:

Then click on the “use” button by bit.ly:
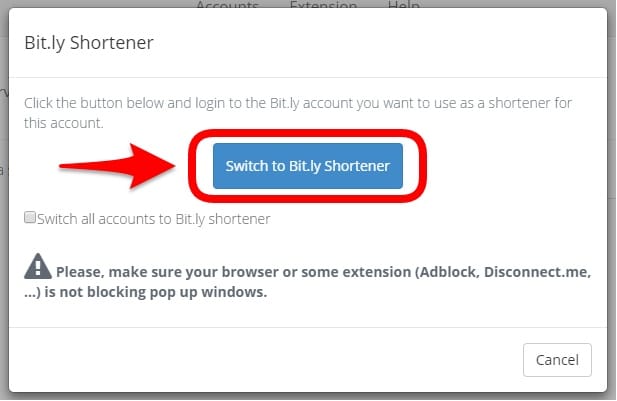
Then click on the big blue button that says “Switch to Bit.ly Shortener”. You also have the option to make all your social accounts in Friends+Me use your custom domain. If you’ve only got one short domain and you want all your accounts to use it, check the box that says “Switch all accounts to Bit.ly shortener”.
Once you’ve done this, you’ll need to give permission for Friends+Me to access your bit.ly account. Click on the allow button and you are done!
SproutSocial*
SproutSocial is a very powerful social media management tool and integrates well with bit.ly. You can use multiple custom domains via multiple bit.ly accounts, but you can only use one per group. That’s a shame because unlike Buffer and Friends+Me you can’t set a specific custom domain per social network. I’m not currently using SproutSocial, but if I were, I’d create a “Seriously Social” group to use to.iag.me and a “Select Performers” group to use select.social. I’d have to use these networks separately since you can’t post to more than one group at a time.
To add your custom domain in SproutSocial, go to business settings in the side bar:

Then scroll down to the bottom and find “settings by group”. Locate the group that you want to add the custom domain to and click “connect” under BIT.LY.

Once you’ve done this, you will need to give permission for SproutSocial to use bit.ly on your behalf. Click approve if you are happy with this and you’re done!
TweetDeck
TweetDeck is a great tool if you manage multiple Twitter accounts. Despite Twitter removing many features over the years, it still integrates with bit.ly. Unfortunately Tweetdeck only allows you to use one short domain for all your accounts, since it only allows the adding of one bit.ly account.
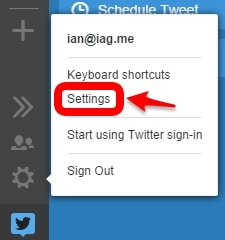
To add your bit.ly account, click on the cog icon on the bottom left, then click “settings”:
Then click on “Services” in the modal window that pops up. Select Bit.ly in the dropdown. You’ll then need to paste in your Bit.ly account’s username and API key.
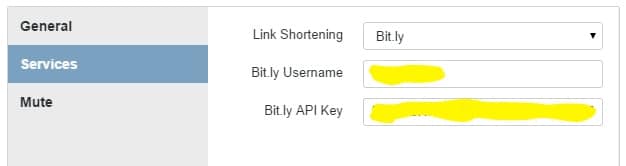
You’ll already have your username, but probably not your API key. To get this, visit settings in bit.ly and then go to the advanced tab (the same place where you set up your custom domain). Your API key will be listed at the bottom.
Edgar
I’ve mentioned Edgar before in my 20+ Twitter Tools article. It makes content marketing easy by scheduling posts to your various social networks from a library of content that you create. You can set up a number of categories and create a schedule for each one. Edgar integrates with bit.ly, allowing you to promote your brand and it makes this very easy. Unfortunately, Edgar currently only allows you to integrate with one bit.ly account. That means all your social networks will use this one short domain.
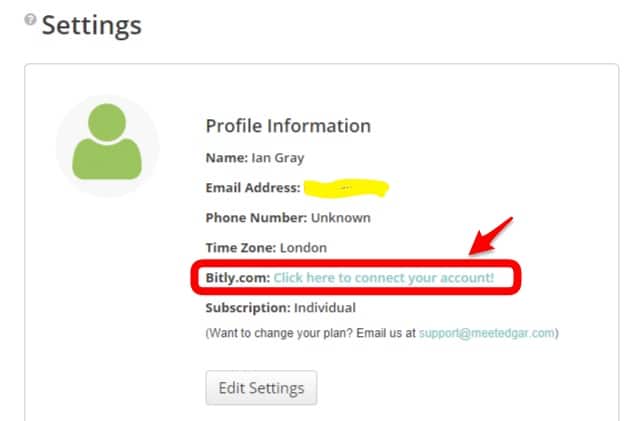
In order to add your bit.ly account, just click on settings in the top menu and then click the “connect your account” link. You’ll need to give permission for Edgar to access your bit.ly account, but once you click approve, you’re done!
Hootsuite*
Unfortunately, Hootsuite does not integrate with bit.ly and it’s one of the main reasons why I don’t use Hootsuite. You can add a custom short domain, but it would have to be a different short domain that you register through Hootsuite. This makes it difficult to have brand consistency if you use a variety of tools to manage your networks. Analysing your links and click-throughs will be difficult too, because Hootsuite will only give you information on links posted within Hootsuite and won’t include information from bit.ly. Probably the biggest obstacle, however is the cost. Hootsuite charge $588.88 per year for the custom domain feature. That’s a pretty hefty sum!
I’ve heard people suggest pasting your bit.ly links into Hootsuite. That will certainly allow you to track links outside of Hootsuite, but Hootsuite will still convert the link into an ow.ly link and your branded domain will not appear.
Your Thoughts?
So, what are you waiting for? It’s time to set up your branded short URL! I’d love to know how you get on- so please let me know your thoughts in the comments below!
About Ian Anderson Gray
 Ian is the founder of the Confident Live Marketing Academy and is the host of the Confident Live Marketing Podcast. He helps entrepreneurs to level up their impact, authority and profits by using live video confidently. He's a geek, husband, and dad to two kids, and trained as professional classical singer. He lives near Manchester in the UK. Find out more
Comments